X

Subscribe To Our Mailing List

P.S I will never spam you...100% GUARANTEED!

Showing posts with label ASP.NET MVC. Show all posts

Friday, October 23, 2015

Child action only in MVC


Introduction

The public methods in the controller class can be called as action. So the actions can be invoked through the URL. But the child actions cannot be directly accessed through the URL instead it will be called from the view.


How to Use

Suppose we have to display the same information across couple of pages /views then we can create a partial view and this partial view can be used in those views.

Child Actions cannot be accessed through the URL. It should be called from the parent view. From the parent view we can use -

@Html.Action("ChildActionMethod", "ControllerName")

Or we can call the child action methods like this -

@{ Html.RenderAction("ChildActionMethod", "ControllerName"); }

And my child action methods should be decorated with the attribute - "ChildActionOnly" - which signifies the action can be called only as a child.

Below is my sample child action method -

[ChildActionOnly]
public ActionResult ChildActionMethod()
{
    return PartialView();
}

So as mentioned above, this child action can be called from -

@Html.Action -> Returns the action result as HTML String.  

@Html.RenderAction -> Renders the action result directly into the view.  

And as you can observe my child action is returning the partial view. Its not mandatory for child action to return the partial view always but its a good practice to return the partial view over view.

If you are accessing the child action method through URL you will get a error like -


Hope it helps. Please comment your thoughts below.


Sunday, March 8, 2015

Clearing client side validation error messages in MVC

Introduction of "Clearing client side validation error messages in MVC"
In this article i am going to explain, how to clear the client side validation messages in MVC. This post will be useful if you are using dataannotation validations in MVC. In forum we were discussing about one scenario -

When you have two buttons in a page "Save" and "Cancel" , on click of "Cancel" button say you are doing AJAX call then you might have observed that client side messages still shown in the page. You might have read my articles - Client side validation using jquery in asp.net mvc and Jquery validation plugin remove rules where i have explained alternate approach for model validations.

Approach for "Clearing client side validation error messages in MVC"
Below is the code for clearing client side validation messages in MVC -

function clearValidationMessages() {
   $('.input-validation-error').addClass('input-validation-valid');
   $('.input-validation-error').removeClass('input-validation-error');
   //removing validation message from  tag created dynamically
   $('.field-validation-error').addClass('field-validation-valid');
   $('.field-validation-error').removeClass('field-validation-error');
   $('.validation-summary-errors').addClass('validation-summary-valid');
   $('.validation-summary-errors').removeClass('validation-summary-errors');
}

Suppose you want to remove validation messages from your partialview/pop up then you can use it like this -

function clearValidationMessages() {
   $('#yourpopupID .input-validation-error').addClass('input-validation-valid');
   $('#yourpopupID .input-validation-error').removeClass('input-validation-error');
   //removing validation message from  tag created dynamically
   $('#yourpopupID .field-validation-error').addClass('field-validation-valid');
   $('#yourpopupID .field-validation-error').removeClass('field-validation-error');
   $('#yourpopupID .validation-summary-errors').addClass('validation-summary-valid');
   $('#yourpopupID .validation-summary-errors').removeClass('validation-summary-errors');
}

Hope it helps to solve your issue as well. Thanks to my colleague shwetha for discussing this issue.

Please comment below.


Tuesday, March 3, 2015

Passing anonymous object to view in ASP.NET MVC

Introduction of "Passing anonymous object to view in ASP.NET MVC"
In this article I am going to discuss about passing anonymous object to my view. In article - Dynamic view model ASP.NET MVC using ExpandoObject i elaborated method to pass dynamic view model using ExpandoObject option. So here in this article i will be reusing models and methods created in previous article.

Practical Approach for "Passing anonymous object to view in ASP.NET MVC"
Now lets dive into practical approach of passing anonymous object to view. As mentioned i will be reusing classes created in the previous article. i.e, Class" and "Student" -
public class Class
{
 public int ClassID { get; set; }
 public string ClassName { get; set; }
}

public class Student
{
 public int StudentID { get; set; }
 public int ClassID { get; set; }
 public string StudentName { get; set; }
}
HomeController after updating looks like this -
public ActionResult Index()
{
 List classes = new List()
 {
  new Class() {ClassID =1, ClassName = "Class1"},
  new Class() {ClassID =2, ClassName = "Class2"},
  new Class() {ClassID =3, ClassName = "Class3"}
 };

 List students = new List()
 {
  new Student() {StudentID = 100, ClassID =1, StudentName = "Student1"},
  new Student() {StudentID = 101, ClassID =1, StudentName = "Student2"},
  new Student() {StudentID = 102, ClassID =1, StudentName = "Student3"},
  new Student() {StudentID = 103, ClassID =2, StudentName = "Student4"},
  new Student() {StudentID = 104, ClassID =2, StudentName = "Student5"},
  new Student() {StudentID = 105, ClassID =3, StudentName = "Student6"}
 };

 IEnumerable studentList1 = students.Where(s => s.ClassID == 1);

 return View(studentList1);
}

As you can see in the above code snippet, I am trying to filter the list students based on Class ID. And my Index view is updated like below -

@model IEnumerable<dynamic>

@{
 ViewBag.Title = "Home Page";
}


<p><b>Student Details</b></p>

<table>
 <tr>
  <th>StudentID</th>
  <th>StudentName</th>
 </tr>
 @foreach (DynamicModelusingAnonymousobjects.Models.Student s in Model)
 {
  <tr>
   <td>@s.StudentID</td>
   <td>@s.StudentName</td>
  </tr>
 }
</table> 

So here in the above code snippet i am trying to bind the students in Class ID = 1. Below is the screenshot of output from my application -


Passing anonymous object to view in ASP.NET MVC

Hope this article is helpful.


Sunday, March 1, 2015

Dynamic view model ASP.NET MVC using ExpandoObject


Introduction of Dynamic view model ASP.NET MVC using ExpandoObject

In this "Dynamic view model ASP.NET MVC using ExpandoObject" article I am going to explain about passing dynamic model to our view in mvc. Here I am trying to use "ExpandoObjects". This has been introduced in .NET 4.0 version. An ExpandoObject object helps us to add or remove members dynamically at runtime.

Note: This article is just to give a information on how we can use dynamic models in mvc using ExpandoObject. But I am strictly against this approach as we can handle these stuffs with different approach as well (without using "ExpandoObject", i will discuss those approaches in the coming weeks though).

Now lets dive in to the practical approach of using dynamic view model using ExpandoObject.

Lets create new classes - "Class" and "Student" to demonstrate this -
public class Class
{
 public int ClassID { get; set; }
 public string ClassName { get; set; }
}

public class Student
{
 public int StudentID { get; set; }
 public int ClassID { get; set; }
 public string StudentName { get; set; }
}
So now lets update the existing Homecontroller to use "ExpandoObject". So below is the updated code -

public ActionResult Index()
{
 dynamic mymodelDetails = new ExpandoObject();
 
 List classes = new List()
 {
  new Class() {ClassID =1, ClassName = "Class1"},
  new Class() {ClassID =2, ClassName = "Class2"},
  new Class() {ClassID =3, ClassName = "Class3"}
 };

 List students = new List()
 {
  new Student() {StudentID = 100, ClassID =1, StudentName = "Student1"},
  new Student() {StudentID = 101, ClassID =1, StudentName = "Student2"},
  new Student() {StudentID = 102, ClassID =1, StudentName = "Student3"},
  new Student() {StudentID = 103, ClassID =2, StudentName = "Student4"},
  new Student() {StudentID = 104, ClassID =2, StudentName = "Student5"},
  new Student() {StudentID = 105, ClassID =3, StudentName = "Student6"}
 };

 //mymodelDetails.Classes = new { Classes = classes }.ToExpando();
 //mymodelDetails.Students = new { Students = students }.ToExpando();

 mymodelDetails.Classes = classes;
 mymodelDetails.Students = students;

 return View(mymodelDetails);
}

So as you can see in the above code snippet, data are populated for these classes and two properties "Classes" and "Students" are added to my dynamic expandoobject - "mymodelDetails".

So these "ExpandoObject" properties are used in the existing Index.cshtml as below -

@model dynamic
@{
    ViewBag.Title = "Home Page";
}

Class Details
<table> <tr> <th>ClassID</th> <th>ClassName</th> </tr> @foreach (PassingDynamicModel.Models.Class c in Model.Classes) { <tr> <td>@c.ClassID</td> <td>@c.ClassName</td> </tr> } </table> <br/> <br />
Student Details
<table> <tr> <th>StudentID</th> <th>StudentName</th> </tr> @foreach (PassingDynamicModel.Models.Student s in Model.Students) { <tr> <td>@s.StudentID</td> <td>@s.StudentName</td> </tr> } </table>

After Executing this we get output like below -

Dynamic view model ASP.NET MVC using ExpandoObject

Hope this article is useful.


Monday, February 16, 2015

Using local storage in jquery

Introduction for using local storage in jquery
Local storage is basically used to store the information at client side i.e, within user browser. Local storage can accommodate more data unlike cookies and the data is secure too.

How localstorage is better than Cookies ?
Below are the pros of localstorage -

  • localstorage is supported by modern browsers out now.
  • localstorage can store nearly 5 MB of data where as cookies can only store 4 KB
  • localstorage data has not been sent in HTTP header unlike cookies.

Above only few pros have been listed since this post is on using the localstorage in our project.

How to use localstorage in my project ?

So i will use the same list of files as i have created in my earlier post. You can find that post here.

And my javascript file has been modified to introduce localstorage. So here i am going to store the value of "Category Name" field (created in previous post) in localstorage as you see below -

$(document).ready(function () {
 $("#saveCategory").click(function () {
  
  var categoryName = $("#CategoryName").val();

  localStorage.setItem('name', categoryName);

  if($("#frmCategory").valid())
   $("#frmCategory").submit();
 }); 
});
In the above code "Category Name" field value is being stored in localstorage having key 'name'.

Now to display the value of localstorage (as alert box)  i will create a new action method as shown below and i change my post action method like this -

[HttpPost]
public ActionResult Index(Category catgr)
{
 return RedirectToAction("TestAction");
}

public ActionResult TestAction()
{
 ViewBag.Message = "Your test page.";
 return View("Test");
}
As you can see above new action method "Test Action" has been added and it is calling "Test.cshtml". So this page is just created to display the localstorage (in alert box).

So below is the code to display the value stored in localstorage -

<script type="text/javascript">

 var value = localStorage.getItem('name');

 alert(value);

 localStorage.removeItem('name');
</script>
So the above script is being added in "Test.cshtml". Make sure you remove the item added in the localstorage once its used because the value will be there till localstorage is being removed or cleared and it could cause some unexpected results.

Hope you enjoyed this article. Please put your comments below.


Saturday, February 14, 2015

Jquery validation plugin remove rules


Introduction of jquery validation plugin

This article is the continuation of my previous jquery validation plugin article Unlike my previous article "Jquery validation plugin rules" here i am trying to remove the data annotation validation dynamically from jquery validation plugin.

Approach for using jquery validation plugin rules

After solving the issues of validate method in my project (explained that issue in this jquery validation plugin post ) i have added the data annotation validations, created a models etc.

Now lets see how we can remove the validations dynamically using jquery validation plugin in my MVC project -

Lets create a new MVC Project from Web template.

First we will create a model which we are going to use across the project -

public class Category
{
 [Required]
 public int CategoryID { get; set; }
 [Required]
 public string CategoryName { get; set; }
}
As you can see in the above code snippet, "Category" model is added with properties - "CategoryID" and "CategoryName" which are required. So basically in page when the user does not enter these values then error message - "Please Enter Category ID or Please Enter Category Name" will be displayed.

Now lets create a controls for these fields -

@using (Html.BeginForm("Index", "Home", FormMethod.Post, new { id = "frmCategory" }))

{

 <div class="row">

  <div>

   <label class="label_txt">@Html.LabelFor(m => m.CategoryID)</label>

   @Html.TextBoxFor(m => m.CategoryID)

  </div>

  <div class="error_align_left align_left_processor">

   @Html.ValidationMessageFor(m => m.CategoryID)

  </div>

 </div>


 <div class="row">

  <div>

   <label class="label_txt">@Html.LabelFor(m => m.CategoryName)</label>

   @Html.TextBoxFor(m => m.CategoryName)

  </div>

  <div class="error_align_left align_left_processor">

   @Html.ValidationMessageFor(m => m.CategoryName)

  </div>

 </div>


 <input type="button" class="saveCategory" value="Save" id="saveCategory" />

}

As you can see above, I am using  type="button" and not type="submit" because in the click event of the button control i will submit the form using jquery. Below is the complete code of Jquery file -

$(document).ready(function () {
 
 $("#saveCategory").click(function () {
  
  if ($("#frmCategory").valid())
   $("#frmCategory").submit();
 }); 
 
});
As you see in the above code we are just validating the form controls. As we discussed earliar, if the user has not entered the value in any of the textboxes, required error will be thrown. So after executing the above code we will get error like this in the screenshot -

Jquery validation plugin remove rules

Now we will try to remove the validation for "Category Name" field and if we enter the value in field "Category ID" the form becomes valid. Let us change the code to remove the validation for "Categoty Name" -

$(document).ready(function () {

 $("#saveCategory").click(function () {

  $("#CategoryName").rules("remove");

  if ($("#frmCategory").valid())
   $("#frmCategory").submit();
 }); 
 
});
So after adding this code validation for "Category Name" field will be disabled. See the below screenshot of the screen as how it looks when "Save" button is clicked -
Jquery validation plugin remove rules

Once enter value for "Category ID" field, the form will be valid and it submits the form and below is the screenshot of post method, which is called after form submit -

Jquery validation plugin remove rules

So null value will be passed to "Category Name" field and the entered value - 5 goes to "Category ID" field.

I hope this article has helped you guys. Please comment your thoughts below.

Sunday, February 8, 2015

Jquery form submit confirm dialog

Introduction of Jquery form submit confirm dialog

Consider a scenario where we need to post the values of ASP.NET MVC Form on click of "Yes" button in confirm dialog. There are many questions raised in different forums on this topic so i thought lets discuss this today. Here i will try to explain how we can do it with easy steps. 

Approach for Jquery form submit confirm dialog

First step would be to create a class called "Customer.cs"  and using this as our model to our view.
 
public class Customer
{
 public string Fname { get; set; }
 public string Lname { get; set; }
 public string Address { get; set; }
}

Jquery form submit confirm dialog
I will use the existing "HomeController.cs" file for this example so lets change the content of "index.cshtml" view to incorporate customer model changes. Below is the sample of ASP.NET MVC Form -


@using (Html.BeginForm("Index", "Home", FormMethod.Post, new { Id = "frmCustomer" }))
{

 <div class="row">

  <div>

   @Html.LabelFor(m => m.Fname)

   @Html.TextBoxFor(m => m.Fname)

  </div>

  <div class="error_align_left align_left_processor">

   @Html.ValidationMessageFor(m => m.Fname)

  </div>

 </div>

 <div class="row">

  <div>

   @Html.LabelFor(m => m.Lname)

   @Html.TextBoxFor(m => m.Lname)

  </div>

  <div class="error_align_left align_left_processor">

   @Html.ValidationMessageFor(m => m.Lname)

  </div>

 </div>

 <div class="row">

  <div>

   @Html.LabelFor(m => m.Address)

   @Html.TextBoxFor(m => m.Address)

  </div>

  <div class="error_align_left align_left_processor">

   @Html.ValidationMessageFor(m => m.Address)

  </div>

 </div>

 <div class="align_left_tabs">

  <input type="button" value="Save" name="Save" id="SaveCustomer" />

 </div>
}

As you can see in the above code snippet of ASP.NET MVC Form, properties  - "Fname", "Lname" and "Address" are all input fields. So once the user enters the data into these text boxes and clicks the "Save" button, Pop up (Confirm Dialog) will appear and it gives user a option either "Save" or "Cancel". So Pop up content will be obtained from partial view. So we are creating an action method to load the pop up. 

Below is the code snippet for these functionalities -

First is loading the partial view on click on "Save" button 
 
<link rel="stylesheet" href="http://code.jquery.com/ui/1.10.3/themes/smoothness/jquery-ui.css" />

<script src="http://code.jquery.com/jquery-1.9.1.js"></script>

<script src="http://code.jquery.com/ui/1.10.3/jquery-ui.js"></script>

<script type="text/javascript">

 var WarningURL = '@Url.Action("WarningPopUp", "Home")';

 $(document).ready(function () { 

  $("#SaveCustomer").click(function () {

   showWarningPopup();

  });


  function showWarningPopup() {

   var $confirm = $("<div id='divWarning'></div>");

   $confirm.empty();

   $confirm.dialog({

    autoOpen: false,

    title: 'Message',

    width: 400,

    draggable: false,

    resizable: false,

    closeOnEscape: false,

    dialogClass: 'no-close',

    modal: true,

    height: 150,

    cache: false,

    open: function (event, ui) {

     $confirm.load(WarningURL);

    }

   });

   $confirm.dialog("open");

   return false;

  }

 });

</script>

As you can see above function - "showWarningPopup" is used to display a pop up (confirm dialog) and "WarningURL" variable is pointing to the action - "WarningPopUp", which is in "Home" controller. 

Action method -
 
public ActionResult WarningPopUp(string name)
{
 return PartialView("_WarningPopup", name);
}

Pop up/ Confirm Dialog code -


<script type="text/javascript">

 function destroyPopup() {

  $('#divWarning').dialog('destroy').remove();

 }

 function postCredentials() {

  $("#frmCustomer").submit();

 }

</script>

<div id="timeOutPopup" class="row_shift20">

 <div style="margin-bottom:50px">Please Confirm Details</div>

 <ul>

  <li class="popUpCancelBtnWidth"><input type="button" value="Cancel" onclick="destroyPopup()" /></li>

  <li class="popUpConfrmBtnWidth"><input type="button" value="Save" onclick="postCredentials();" class="green_input" /></li>

 </ul>
</div>
The above method is quite straight forward. As we discussed on click of "Save" button javascript function - "postCredentials" which submits the parent form (which has user entered values). After putting breakpoint in the post method it looked like this -

Jquery form submit confirm dialog

Hope you enjoyed this article of ASP.NET MVC Form even though it is long. Please comment your thoughts below.

Wednesday, December 17, 2014

jquery validation - Client side validation using jquery in asp.net mvc

Introduction for "client side validation using jquery in asp.net mvc"

In most of the cases we are going to use Data Annotations for validation in MVC. Let's not forget the point of unobtrusive client-side validation which turned out to be a boon for the developers. In unobtrusive client-side validation, validation rules are defined using attributes added to the generated HTML elements. This article will focus on adding the validation rules from client side.

client side validation using jquery in asp.net mvc
Let's get started

Now let's dive into the code part as how we can add the rules for the controls. Before that i need to discuss when we can use this type of approach – Consider a scenario where you are re-using the page with hide and show the controls of the page, eg : if one client wants textbox and another client wants dropdownlist for the same field in a same page and if the validation rules are different for both these controls then adding the rules from client side would be a better approach.

For enabling client side validation, we required to include following scripts in our view or layout page in the following order.

<script src="~/Scripts/jquery-{version}.min.js" type="text/javascript"></script>
<script src="~/Scripts/jquery.validate.min.js" type="text/javascript"></script>
<script src="~/Scripts/jquery.validate.unobtrusive.min.js" type="text/javascript"></script>

Now lets create a new project for this and lets add the controller, models, views and javascript for our project.

  1. Create a new MVC project 
  2. Add a new controller called "ProductController"
  3. Add a new model called "ProductModel" and add the properties - Name, Description and Amount
  4. Add a new view called "Index.html" for our product
  5. Add a new javascript file for validation "productvalidation.js"

Now we will just set the validation rules for all the properties in the ProductModel in productvalidation.js file. Script for adding the validation rules for our controls in a page -

$(document).ready(function () {

    var regexAlpabetsOnly = /^[a-zA-Z\- ']*$/;
    var regexNumbersOnly = /^\d+$/;
   
    $('#Name').rules("add", {
       required: true,
       minlength: 2,
       messages: {
         required: "Please enter name",
         minlength: "At least 2 characters are mandatory"
       }
   });

   $('#Description').rules("add", {
      required: true,
      regex: regexAlpabetsOnly,
      maxlength : 20,
      messages: {
        required: "Please enter description",
        regex: "Please enter alphabets in description field",
        maxlength: "Exceeded maximum length of description"
      }
  });

   $('#Amount').rules("add", {
      required: true,
      regex: regexNumbersOnly,
      messages: {
        required: "Please enter Amount",
        regex: "Please enter numbers in amount field"
      }
   });

 });

As you see above nothing fancy all are straight forward and we have following validations -

  • For "Name" property we are adding required field validation and minimum length validation.
  • For "Description" property we are adding required field validation and regex validation to allow only alphabets.
  • For "Amount" property we are adding required field validation and regex validation to allow only numbers.

All are fine but only concern here is error messages are hardcoded. So its always a better idea to get these texts from resource file instead of hardcoding.

Now lets add the resource file and move these texts into resource file. For brevity i have not given the lump steps here -

Once its added the next would be to get the resource file data to javascript and that again is easy. Better option to do this is serialize the resource file and pass the JSON object to javascript.

Lets do that now -

In Controller lets add a method which will return JSON object -

[HttpGet]
public JavaScriptResult GetResourceFileData()
{
 return ResourceSerialiser.GetResourceSerailizedData(Resource.ResourceManager);
} 

For Serializing the resource file data -
 
public static JavaScriptResult GetResourceSerailizedData(ResourceManager resourceManager)
  {
     string cacheName = string.Format
       ("ResourceJavaScripter.{0}", CultureInfo.CurrentCulture.Name);

     JavaScriptResult value = HttpRuntime.Cache.Get(cacheName) as JavaScriptResult;

     if (value == null)
     {
        JavaScriptResult javaScriptResult = CreateResourceJSON(resourceManager);
        HttpContext.Current.Cache.Insert(cacheName, javaScriptResult);
        return javaScriptResult;
     }

      return value;
  }

  static JavaScriptResult CreateResourceJSON(ResourceManager resourceManager)
  {
       ResourceSet defaultSet = resourceManager.GetResourceSet
             (CultureInfo.GetCultureInfo("en"), true, true);
       ResourceSet resourceSet = resourceManager.GetResourceSet
             (CultureInfo.CurrentCulture, true, true);

       var resourceBaseName = resourceManager.BaseName;
       var jsonObjectName = resourceBaseName.Substring(resourceBaseName.LastIndexOf(".") + 1);

       StringBuilder sb = new StringBuilder();
       sb.Append("[");
       sb.Append("{");

       foreach (DictionaryEntry dictionaryEntry in resourceSet)
            if (dictionaryEntry.Value is string)
           {
                string value = resourceSet.GetString
                    ((string)dictionaryEntry.Key) ?? (string)dictionaryEntry.Value;
                sb.AppendFormat("\"{0}\":\"{1}\"", dictionaryEntry.Key, Encode(value));
                sb.Append(",");
           }


        string script = sb.ToString();
        if (!string.IsNullOrEmpty(script)) 
             script = script.Remove(script.Length - 1);


        script += "}]";
   

        JavaScriptResult result = new JavaScriptResult { Script = script };
        return result;
    } 

    static string Encode(string val)
    {
         val = (val).Replace("\"", "\\\"").Replace('{', '[').Replace('}', ']');
         val = val.Trim();
         val = System.Text.RegularExpressions.Regex.Replace(val, @"\s", " ");
         return val;
    }

In javascript lets add a new AJAX call to get the JSON object from controller method -

$.ajax({
  cache: false,
  type: "GET",
  url: "Product/GlobalResourceFileData",
  async: false, 
  dataType: "json",
  success: function (resourceData) {
   resourceFilevalues = resourceData[0];
  }
 });

" resourceFilevalues " is global variable which is used to receive the JSON object in AJAX call given above.

Now the hardcoded values will be replaced by the resource file properties like below -

$('#Name').rules("add", {
  required: true,
  minlength: 2,
  messages: {
   required: resourceFilevalues.NameRequiredErrMessage,
   minlength: resourceFilevalues.NameMinLengthErrMessage
  }
 });

 $('#Description').rules("add", {
  required: true,
  regex: regexAlpabetsOnly,
  maxlength : 20,
  messages: {
   required: resourceFilevalues.DescriptionRequiredErrMessage,
   regex: resourceFilevalues.DescriptionRegexErrMessage,
   maxlength: resourceFilevalues.DescriptionMaxLengthErrMessage
  }
 });

 $('#Amount').rules("add", {
  required: true,
  regex: regexNumbersOnly,
  messages: {
   required: resourceFilevalues.AmountRequiredErrMessage,
   regex: resourceFilevalues.AmountRegexErrMessage
  }
 });

So hope this article is useful and i agree this is the longest post i have written :-)

Monday, December 1, 2014

MVC override controller methods

As you have seen in my post -  Overriding RazorViewEngine in MVC here in this post also i am trying to override the path of the view but this time by overriding controller rather than creating the custom view engine.

Now lets dive in to the code part -

Here i am going to reuse the controllers and folders created in the last post and I will be creating a new controller named "BaseController.cs" and this will be inherited from "Controller" class. This BaseController is used as a base class for all the controllers like Home,Contact etc.

public class BaseController : Controller
{
     protected override ViewResult View(string ViewName, string masterName, object model)
     {
         ViewResult renderview = null;

         if (Session != null && Session["TestFolder"] != null)
         {
            if (System.IO.File.Exists(Server.MapPath(VirtualPathUtility.ToAbsolute("~/Views" 
                                  + Session["TestFolder"].ToString().Trim() + "/" + ViewName + ".cshtml"))))
            {
                renderview = base.View("~/Views/" + Session["TestFolder"].ToString().Trim()+ "/" + ViewName + ".cshtml"
                                  , masterName, model);
            }
            else
            {
                renderview = base.View("~/Views/Shared/" + ViewName + ".cshtml", masterName, model);
            }
   
         }
         else
         {
             renderview = base.View("~/Views/Shared/" + ViewName + ".cshtml", masterName, model);
         }

         if (renderview != null)
              return renderview;


         return base.View(ViewName, masterName, model);
     }
}

As you can see in the above code i am overriding the method  "Viewof Controller class , which is been called on "return View()" in action. 

Note :  To get the value for "ViewName" parameter in the above method you have to make sure that you will pass the name of the view - return View("yourviewname") 

The above method searches the view in "AllViews" folder (Session["TestFolder"]) and in case view did not found in that location then it tries to search in "/Shared" folder.
For partial Views we have similar method -
protected override PartialViewResult PartialView(string viewName, object model)
{
 return base.PartialView(viewName, model);
}

So the main drawback of this approach is if in the view uses - "@HTML.Partial("partialviewname")" then both of the above methods would not be called then we need to go with approach of overriding razor view engine as I have shown in the last post. 

Sunday, November 30, 2014

Overriding razor view engine

Introduction of overriding razor view engine

View Engines are used to render the HTML from your views to the browser. These View Engines can be customized in our own way. So this article focuses on customizing the default view engine.
There are basically 2 view engines 

  • Razor View EngineThis is an popular view engine and it was introduced with MVC3. Namespace for Razor Engine is System.Web.Razor .Razor uses @ symbol as shown in the below code snippet -
  • @foreach(var item in Model) {
        <tr>
            <td>@item.ID</td>
        </tr>
    }
  • Web Form (ASPX) View EngineThis is the default view engine for the Asp.net MVC and was  included with Asp.net MVC from the beginning. Namespace for WebFormEngine is System.Web.Mvc.WebFormViewEngine. Below is the code snippet with WebformEngine syntax -
  • <% foreach(var item in Model) { %>
        <tr>
            <td> <%: item.ID %> </td>
        </tr>
    <% } %>

How Razor View Engine Works 
Default View Engine searches the page in the corresponding Controller folder and in Shared folder under Views folder.
For an instance consider you have "Index" action (say it loads Index.cshtml) in the "Home" controller and by routing you have configured that to be loaded first when you run the application. 
In the above scenario "Index.cshtml" searched in "Home" folder and "Shared" folder under Views. 

Customizing Razor View Engine
So for the demonstration purpose lets add new folder called "AllViews" under Views folder. Now lets add "Index.html" inside this newly created folder. Below image shows my solution explorer view -

overriding razor view engine


As you can see i removed the "Index.cshtml" view from "Home" folder. So whenever Index action of the home controller is called it should search the "Index.cshtml" in "AllViews" folder.

Below is the code to customize the path of view -


public class CustomViewEngine : RazorViewEngine
{

        public override ViewEngineResult FindView(ControllerContext controllerContext, string viewName, 
                              string masterName, bool useCache) 
        {
           string viewPath = string.Empty;
           string masterPath = string.Empty; 
           string fullPath = string.Empty;
           string controllerName = controllerContext.RouteData.Values["controller"].ToString();
           string actionName = controllerContext.RouteData.Values["action"].ToString();

           if (HttpContext.Current.Session != null && HttpContext.Current.Session["TestFolder"] != null)
           {
               string testFolder = HttpContext.Current.Session["TestFolder"].ToString();

               if (!string.IsNullOrWhiteSpace(testFolder))
               {
                    // Get the value for your config instead of hardcoding
                   viewPath = "~/Views/" + testFolder + "/" + viewName + ".cshtml"; 
                  //masterPath = "~/Shared/" + masterName;  // Use it if required

                   fullPath = HttpContext.Current.Server.MapPath(viewPath);

                  if (System.IO.File.Exists(fullPath))
                  {
                       return new ViewEngineResult(base.CreateView(controllerContext, viewPath, 
                                                     masterPath), this);
                  }

               }
           }
           
           //Search in default Location "ControllerName/ViewName -- overriding razor view engine
           viewPath = "~/Views/" + controllerName + "/" + viewName + ".cshtml";
           return new ViewEngineResult(base.CreateView(controllerContext, viewPath, masterPath), this);
       }
 }

So as per the code priority is given to "AllViews" folder if view not found in that path then it searches in the default locations as discussed above. And as you can see "Session["TestFolder]" which has value "AllViews". 
Now we have to configure this custom view engine in Global.asax file


protected void Application_Start()
  {
            AreaRegistration.RegisterAllAreas();
            FilterConfig.RegisterGlobalFilters(GlobalFilters.Filters);
            RouteConfig.RegisterRoutes(RouteTable.Routes);
            BundleConfig.RegisterBundles(BundleTable.Bundles);

            // Configuration Starts Here
            ViewEngines.Engines.Clear();
            ViewEngines.Engines.Add(new CustomViewEngine());
  }

Similarly for Partial View we use the below method-

 
public override ViewEngineResult FindPartialView(ControllerContext controllerContext, 
                                                       string partialViewName, bool useCache)
  {
         //Do Something Here
  }

Tuesday, September 9, 2014

Custom Model Binder in MVC

Introduction

Model Binding is one of the fundamental feature of MVC and this is used to convert form values, route data values or any value from a datasource in Model objects. Defaultmodelbinder is internally used to bind the model when you post the data to server, which is derived from “IModelBinder” interface.

Custom Model Binder in MVC
How it Works

Lets create a sample to demonstrate how this works. And Obviously in our project we will get the data from database but during this exercise i will hardcode the data in controller itself because this article mainly focuses on Model Binding.
   1.Lets add a new MVC Project as below -
Custom Model Binder in MVC

2. Create a Controller called – “EmployeeController.cs” and view corresponding to this controller and call it as “Index.cshtml”.
3. Now lets create a class called “Employee.cs” and i will take arsenal club player names for Employee Names because i just love them :-)
 public class Employee
 {
    public int EmpID { get; set; }
    public string EmpFirstName { get; set; }
    public string EmpLastName { get; set; }
    public string EmpCountry { get; set; }

    public static List GetEmployees()
    {
       return new List
       {
           new Employee { EmpID = 1, EmpFirstName = "Alexis", EmpLastName = "Sanchez", EmpCountry= "Chile"},
           new Employee { EmpID = 2, EmpFirstName = "Jack", EmpLastName = "Wilshere", EmpCountry= "England"},
           new Employee { EmpID = 3, EmpFirstName = "Aaron", EmpLastName = "Ramsey", EmpCountry= "Wales"},
           new Employee { EmpID = 4, EmpFirstName = "Theo", EmpLastName = "Walcott", EmpCountry= "England"}
                           
        };
        
     }
 }
4. Now its time to create a viewmodel for our view. Lets call it as “EmpViewModel.cs
public class EmpViewModel
{
   public List Employees { get; set; }
}
5. So in my EmployeeController i will add 2 action methods one for “GET” and another for “POST”. 
public class EmployeeController : Controller
 {
    public ActionResult Index()
    {
        EmpViewModel vwModel = new EmpViewModel()
        {
            Employees = Employee.GetEmployees()
        };

        return View(vwModel);
     }

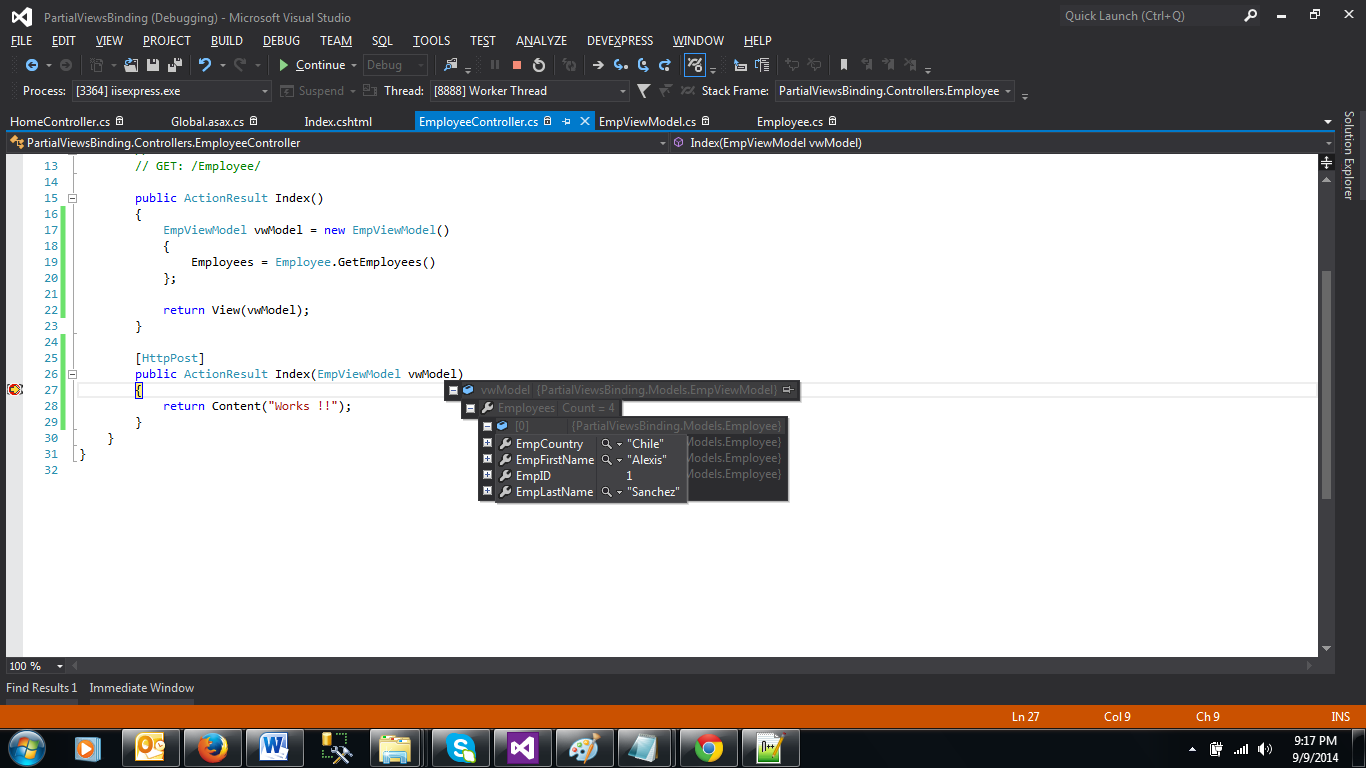
     [HttpPost]
     public ActionResult Index(EmpViewModel vwModel) 
     {
        return Content("Works !!");
     }

  }
6. In my Index.cshtml i will add the fields which are to be displayed or to be edited.
@model PartialViewsBinding.Models.EmpViewModel
           
@{
    ViewBag.Title = "Home Page";
}

@using (Html.BeginForm())
{
    for (int i = 0; i < Model.Employees.Count; i++)
    {
        @Html.HiddenFor(m => m.Employees[i].EmpID)

        @Html.TextBoxFor(m => m.Employees[i].EmpFirstName)
        @Html.TextBoxFor(m => m.Employees[i].EmpLastName)
        @Html.TextBoxFor(m => m.Employees[i].EmpCountry)

    }
    
   <input type="submit" value="Click Here" /> 

}
You can check the below screenshot of Index.cshtml during runtime -


Custom Model Binder in MVC

Now i will change the names and i will check in the action method whether i will be getting the same and  my model binding properly or not.


Custom Model Binder in MVC

In above figure i made sure the data binding properly to my action method. 

So now coming to the main topic "Custom Model Binder", for demonstrating this lets create a new property in Employee class and lets call it as  "EmpName". Intention behind adding this property would be just to bind this property from "FirstName" and "LastName"  of employee. (Please note : This is just for demonstration. This would not be the scenario in your live projects.)
Now i am going to add the custom binder for this -   
 public class FullNameModelBinder : DefaultModelBinder
  {
        public override object BindModel(ControllerContext controllerContext,
                             ModelBindingContext bindingContext)
        {
            int i = 0;
            List emps = new List();
            HttpRequestBase request = controllerContext.HttpContext.Request;

            while (!string.IsNullOrEmpty(request.Form["Employees[" + i + "].EmpID"]))
            {
                var emp = new Employee();
                emp.EmpID = int.Parse(request.Form["Employees[" + i + "].EmpID"]);
                emp.EmpName = request.Form["Employees[" + i + "].EmpFirstName"] + " " + request.Form["Employees[" + i + "].EmpLastName"];
                emp.EmpCountry = request.Form["Employees[" + i + "].EmpCountry"];

                emps.Add(emp);
                i++;
            }

            return new EmpViewModel()
            {
               Employees = emps
            };
        }
   }

Now add the entry in Global.asax file to intimate the compiler about custom binder.
protected void Application_Start()
 {
    AreaRegistration.RegisterAllAreas();

    WebApiConfig.Register(GlobalConfiguration.Configuration);
    FilterConfig.RegisterGlobalFilters(GlobalFilters.Filters);
    RouteConfig.RegisterRoutes(RouteTable.Routes);
    BundleConfig.RegisterBundles(BundleTable.Bundles);
    AuthConfig.RegisterAuth();

    ModelBinders.Binders.Add(typeof(EmpViewModel), new FullNameModelBinder());
  }

Now add the binder in the Post method to get the name based on firstname and lastname.

// ([ModelBinder(typeof(FullNameModelBinder))]EmpViewModel vwModel)

     [HttpPost]
    public ActionResult Index([ModelBinder(typeof(FullNameModelBinder))]EmpViewModel vwModel)
    {
        return RedirectToAction("Index");
    }

Done !!! now the property EmpName has been bound from FirstName and LastName. 

Sunday, June 15, 2014

MVC Route Debugger – GLIMPSE

As we all know MVC pattern purely relies on Routing. In ASP.NET MVC routing, you can define URL patterns that map to request-handler files, but that do not necessarily include the names of those files in the URL. In addition, you can include placeholders in a URL pattern so that variable data can be passed to the request handler without requiring a query string. So here i am not elaborating much on MVC pattern and Routing mechanism. So this post is written mainly concentrating on the mvc routing debugger.
I know there are lot of people loving to code in MVC. But there are lot of people like me who struggled a lot in the MVC Routing, who are not able to find which method is being called on client request.
To overcome this there are lots of tools came in the market to ease the debugging the routing part. So here i am going to explain the debugger called “Glimpse”, which is used by majority of the people to debug their routing needs.
So what is Glimpse ?
Glimpse is like the FireBug client side debugger, except it’s implemented in JavaScript on the client side with hooks in to ASP.NET on the Server Side.
How i can use it in my Visual Studio Project ?
So here i am going to explain you the steps to use “Glimpse” in your project -
Open your Visual Studio -> Click on New Project -> Click on Web -> Select ASP.NET MVC4 Web Application

MVC Route Debugger – GLIMPSE


Click on Tools -> Nuget Package Manager -> Package Manager Console -> Install-Package Glimpse


MVC Route Debugger – GLIMPSE


and Install Glimpse for MVC4 using command -> Install-Package Glimpse.MVC4
You can observe the change in your web.config, it adds the few lines which are relevant to glimpse.

Now, I will run my app. I can turn Glimpse on like visiting http://localhost:portname//glimpse.axd and click on button “Turn Glimpse On”

You can see the below toolbar at the bottom of the screen -
MVC Route Debugger – GLIMPSE


In the above screenshot you can check the request details, method called in server, time taken to get the response etc. which i feel is boon to all developers to track the code and debug. 
This article is just for overview of it you can check more on - http://www.getglimpse.com